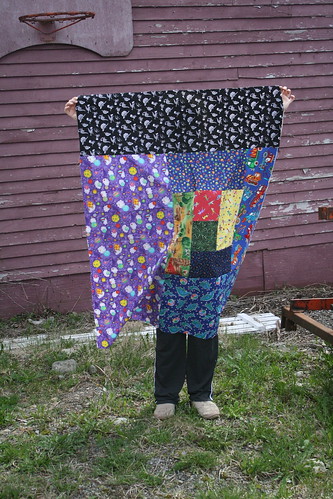
Isabella’s birthday quilt

Posted on 1 Comment

My number one granddaughter turned five this month, and I made her a special quilt!

I had a couple of bright but smaller charm packs on hand, ones purchased at Wal-Mart. They were cheap, partly because of fabric quality and party because they were half the amount of regular charm packs.

For last Christmas, Isabella gave me a fabric roll of 2.5″ strips, also from Wal-Mart. They weren’t the exact same prints as the charm packs I had, but they co-ordinated well enough.

One day when Izzy was over for a visit, I asked her to match up a strip and a square, to put together ones she thought looked nice.

Some of them were crazy indeed! Once I started piecing the blocks I had to match up more and also add some more strips from my stash. But there are a good number of blocks that Isabella can look at and say, “I did that!”

IMG_2599

I got the blocks pieced over most of one day. Over a couple other days, I picked the backing fabrics -two vintage small floral prints – and prepped the binding, one of the extra fabrics I pulled from my stash.

I also decided, since she likes heavy warm quilts, to use two layers of batting. I have a lot of battings scraps built up, so I pieced two layers. One layer is my 50/50 warm and natural, the other layer is Hobbs cotton, possibly with some 80/20 blends in there too. I didn’t get a picture of the battings I pieced, but it made a nice dent in the stash, and for a kid quilt will be fine.
IMG_2601

Basting went pretty fast, maybe only 20 minutes total. I quilted it on my Bernina 440 QE, with a meandering loop-de-loop pattern. It perfectly fits the bright spirit of the quilt and Izzy’s personality.

IMG_2604

I even remembered to label it this time.

Two more shots of the full quilt.

IMG_2602

IMG_2603

Birthday girl opened it up and said “Awwww! I LOVE IT!” and cuddled it lots.

First Friday finish!

Posted on 1 Comment

I finished the Glimmer table topper last night, hand stitching the binding down.

I cut the binding 2.25″ instead of my usual 2.5″, on the straight grain.

Press, sew to front, fold to back and even pressed to help turn. Hand stitched in white quilting thread that was my grandmother’s. It still in excellent condition.

IMG_2319

Then I realized I’d made a lighter mostly red topper and had a matching mostly green topper from the same line of fabrics.

IMG_2320

They even stack nice! All ready for next Christmas.

IMG_2321

Linking up to Crazy Mom Quilts and her Friday finishes, which are hard for me to post to, since I do the bulk of my sewing on Friday/Saturday – my days off – and I try and spend little time on my computer. So I mostly forget by Sunday/Monday to go back and link up.

Oversize log cabin

Posted on 4 Comments

I made this oversize single log cabin block quilt way back in May of 2012.

boy log cabin

I just pulled pieces of kid prints from my stash and went to town, building up a block until it was a decent size. I did very little cutting of fabric.

This summer, I finally got around to quilting it. I backed it in a cheery dinosaur print and did an allover stipple. It was fast. Then I bound it in this great lime green solid.

You can buy this quilt in my Etsy shop too.

Two Runners

Posted on Leave a comment

I finished two table runners this summer, as well. Both use fabrics from the same christmas line – Jingle All the Way and some Bernartex basics that co-ordinated.

Both runners were from the same pattern, Little Charmers 2. I love her patterns, I want them all.

I separated the dark greens, blues and the yellows for the starry runner. In the background I quilted spirals and in the stars I did straight line, somewhat dot to dot quilting.

For the blocks runner, I used the reds, lighter greens and beiges to build up the design. I messed up the color placement but anyone I showed it to couldn’t tell the difference. I quilted a leafy design following the blocks. Since it is both Christmassy and summery I called it Christmas in Australia.

Both of these runners are available in my Etsy shop.

Rainbow Northern Lights mini

Posted on 1 Comment

I used the Hex n More ruler and the Northern Lights pattern to make a rainbow wall hanging. I followed the pattern but used the smallest size on the ruler.

It took a while because of the small pieces and I kept putting it down to work on other things. But, once the top was completely done, I did straight line quilting to match the zig zag effect, bound it in black and sent it off as a gift.

I sent it to the head office of the company I work for, so they had more bright art on the walls. They loved it!

I will probably make this again.

As always, click images for bigger.

Quilting the Jitterbug Quilt

Posted on Leave a comment

Ages ago (March 2011) I started the Jitterbug quilt that is on the cover of Layer Cake, Jelly Roll & Charm Quilts. I even bought 1930’s reproduction prints off eBay. Got a deal on those, still using some of them up.

I had piecing issues and pressing issues with this quilt. I know it’s my technique, not the pattern and I’ve learned a bunch since then even. Like maybe not do 2.5″ HSTs. At least not without tons of starch.

The top was done for quite a while and was stuck with the rest waiting for batting. I finally basted it this summer. The only other issue I had was what to quilt. The pieces really were too small to do much custom fancy quilting, so I just stitched in the ditch.

At least it worked. Even if the entire process of this quilt was frustrating.

I bound the edges in scraps of the 30’s prints as well. The backing is just plain white. It’s a good old fashioned quilt and I probably should label it. Ron likes it and we keep it on the spare bed.

The Mariner’s Compass quilt

Posted on 4 Comments

I got super inspired for this quilt basically when I saw the starry fabric. I dug out navy and yellow scraps and made some borders for the large piece of starry fabric, then used mostly yellows with a strips of blues for the back. So the front could be night and the back day. When I started this back in 2009 (!) I actually called it Night and Day.

I knew I wanted a large focal point that was quilted much like a wholecloth quilt is. I then decided it would be a mariner’s compass design. I looked up a bunch of tutorials on how to draw this mariner’s compass, including making a compass from a pencil and a piece of string. I used chalk to draw the lines on my quilt.

For the straight lines, I used a walking foot and navy thread. This also helped stabilize the quilt. To form the dark and light effect, I quilted with yellow thread on one side of each point and navy on the opposite side. The quilting technique I used is called McTavishing. Love it! I got pretty good at it by the end.

For the background of the compass in the sky, I did a regular stipple, in navy thread. I wanted the central focal point to stand out and the background to fade away.

In the narrow yellow border, I did a rope design – much like a ship would have. The wider blue border I had no ideas for so I’ve left them empty. I can always go back and fill them in. The binding is more scraps of blue and yellow.

You see, I did this quilt for two reasons: my grandfather and my granddaughter. My grandfather was a ship builder. Our home town is by the sea and the ocean is in our blood. On a clear night, I will look up to the sky and find Orion to orient myself.

My granddaughter love space. She insists I help her look up space videos on youTube and find out what the Mars Rover is doing. She talks about spaceships and maybe when she’s bigger she can go to space and visit other planets. In her lifetime this may be possible.

So – from ships on the sea to space ships in the sky, the stars will guide them home.

This quilt is just for me – not for sale, not for any reason but to pay homage to the travellers in our family and the stars in the sky.

Grey Tula Pink Parisville quilt

Posted on 1 Comment

When I went to hunt down previous posts about this quilt, I shocked myself in realizing it’s been over two years since I started this one.

Oops?

At any rate, the top was done, or so I thought. Then I decided to use up all the jelly roll and make it bigger. All but 4 pieces, which I used as an ipad cozy. (Then I took it apart because I never actually USED it with my ipad. Those bits went in the scrap bin).

So. Then the top was done and waiting for batting and I FINALLY got around to quilting it.

Again inspired heavily by Angela Walters, not to copy it completely but to really learn from her techniques and example, I did a different design in each strip. I also did pebbling in all the grey negative spaces around the strips.

While I emphasized the print strips, for the grey parts I just went all out as if it were one piece. Because it is – the background.

FYI pebbling takes a LOT of thread. I think I used up 5 bobbins, easy. I’m starting to write this stuff down and take notes too.

This quilt wound up around a lap / twin size. I debated back and forth, and eventually listed it in my Etsy shop.

The Bee Quilt

Posted on 1 Comment

I took on my first real commissioned quilt. It may have even started this time last year. A friend in far away California wanted a special and very specific quilt made.

It needed to be linen.
It needed a shield design with bees.
It was for someone in the SCA, which has very specific rules. (basically historical re-enactors)

Now, up until then, I hadn’t worked with linen in a quilt and I have said in the past I didn’t really like applique. The image I was given for the shield was roughly 4″ high. The finished quilt needed to be queen/king/as large as possible.

Plus, this was for a friend, so I wanted it to be as perfect as possible, right?

Work on this really started in earnest back in October / November. the recipient finally got it last week. That is how long it took me. It might have taken less time without the creative angst.

IMG_6294

I had to do a lot of manual figuring out of things. The natural linen I managed to find at an incredible price online and bought all of what they had left – it was either 8.5 or 10 yards. Just barely enough. The purple and yellow were bought locally at a chain store, 1 meter of yellow, 2 of purple.

IMG_6295

The shield part I figured out by laying out on my own queen sized bed and draping the fabric. The width of the shield is the full 45″ width of the fabric. I drew the rest of the shield according to historical direction. I had to do the curves with a pencil and string compass.

IMG_1568

For the bees, again I had to go by my best guesstimate. I took the image I was given, enlarged it significantly and cleaned it up in Photoshop the best I could, then I printed it out, traced it out while cleaning up and smoothing out the lines and checked the fit.

IMG_1612

The yellow part of the shield was tricky and I did have to ask the client if the bee in this section needed to be bigger or not. Technically it should have been for greater accuracy but we decided this was good enough. I appliqued the contrast areas to each bee first, then applied them to the shield itself.

IMG_1764

I then pinned the shield super carefully on the pieced top and sewed that on with a zig zag applique stitch like the rest.

IMG_1836

When it came time to baste, some of the top and back was actually larger than the queen sized piece of batting. I did use 100% cotton batting. Lots of careful pinning and trimming here. This living / dining room of ours is a huge room, but we still had to push back one loveseat and the dining room table in order to baste the whole thing.

IMG_1851

My design for quilting the shield area was all stippling and outlining the bees. This was for movement to mimic how bees seem to meander everywhere. in the main quilt background, I decided a simple crosshatch grid would not only look great but be reminiscent of medieval quilted armour padding. Especially good since it was this era the client re-enacted, so it would be close to historical. While I did machine quilt it, I also used 100% cotton thread here too. I have a super huge cone of beige thread that I’m still not sure when i might ever see the end of. I think it’s 10,000 yards.

I used my 18″ by 3″ wide ruler to help create the gird and marked it with tailor’s chalk in a rust color. It was slow going and I did get off course a bit but managed to correct it when I met in the middle.  I started at one side, then moved to the other to join up at the bottom front where I could work out any misalignments in a low visibility area.

Next time i Need to use a yardstick or something longer.

IMG_1852

Back of the quilt showing some piecing.

IMG_1855

Back of the shield area showing the bees.

IMG_1880

The quilt after washing. YES I tossed it in my washer and dryer to see how it held up and to repair anything that needed to be resewn. Nothing came undone. I wanted this quilt to be able to handle the rigours of use. If you think a cotton quilt looks amazing after washing a linen one is fantastic. This is so warm feeling and heavy – not to mention soft. I had just barely enough linen left with some trimming to do the single fold binding. I think I cut 2″ strips, so it was quite narrow. I machine stitched it on.

IMG_1883

The client is absolutely over the moon and I am super happy.

I did a few small projects after this one though. 😉 While working on this I think I went through two whole seasons of the X Files on Netflix.

From my notes, I used:
3 bobbins purple thread
7 bobbins beige thread

And spent 9 hours, 40 mins quilting, marking and making / applying binding. Does not include piecing or design time. That was at least another 3 hours.

Christmas table topper and candy quilting

Posted on Leave a comment

Hiya!

I made a small project to help get me back in the swing of things. I was at my local quilt shop and spotted this super cute table topper pattern  called “Sticks and Stones” from This & That patterns

From my stash, I pulled out a charm pack of Jingle All the Way fabric that I had saved up. It’s hard to find now.

Table topper pieced. Okay so it's Christmas fabrics.

For the quilting, I used some free motion tutorials from The Inbox Jaunt.

Ribbon Candy Quilting
Candy Stripes Quilting

Table topper quilted with ribbon candy tutorial from @theinboxjaunt I added my own circle candies in the squares.

I did my own peppermint candies in the larger squares and them some marble-like gum balls in some of the small squares.

And then bound it in the darker green.

And bound. Glad I went with green binding.

Quilting back. Yummy texture!