Finishing an old quilt top: Spools Blocks

Posted on Leave a comment

Yesterday on my day off I was super tired and worn out, so I didn’t want to work on anything client related unless I screwed it up. This is almost a given, if I sew when tired.

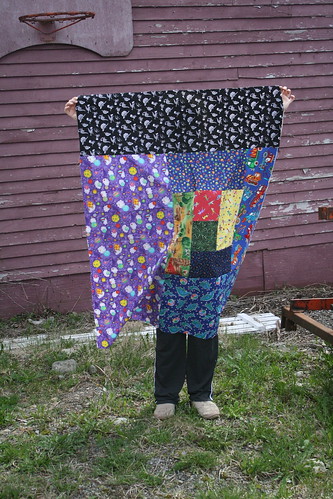
I went to my sewing cave and decided to look at tops I have waiting to be pieced to see which ones I could do some mindless sewing on. There is one top where all the rows are done, I just have to sew them together, and I had recently dug out a bag of 23 finished blocks that needed sashing.

Sorting out fabric and blocks is a good thing to do when you don’t feel like much else. I also dug out my box of white scraps and found suitable bits to use for sashing.

I cut out the short bits first and dint stop to think how many I needed and cut out far too much. Then I had to dig out more quite scraps for the longer pieces. I would up having to piece the long sashings anyway, but the less seams on those the better.

I also had to decide how to lay them out and with 23 blocks it was either give up some or add some. On a whim, I decided to try and find the original pattern I’d used. Still had the book because it was one of my grandmother’s. None of it was strip piecing, no. Just cut out these triangles and this trapezoid. I almost want to make an easier version for the precuts of today.

It was also super interesting to see how far I’d come with my piecing. Some of the blocks were made with leftover bits from garments I’d made in the mid to late nineties, so there were pieced scraps and bits cut off grain mostly so I would have enough to fit in the blocks themselves.

I also got way better at piecing in general – even if my newer blocks would up a good half inch bigger.

I ran into trouble with one row where I’d added two new blocks and of course hadn’t really trimmed to match. With seam ripper in hand (again) I had to fix some wobbly sashing. That was the fourth and last time I used the seam ripper on this top.

I’d miscounted and wound up with an extra block, then found a very unsuitable block done with rayon type fabric that would never have help up to daily wear. I had to excise it from almost the middle of the quilt. Not to mention whipping up 3 blocks and adding sashing took me well over 4 hours – something I can do in two on a good day.

IMG_2517

In the end I have a useable if not sellable quilt top – and one wonky block at the end with some spools cut almost in half to make things even.

IMG_2520

I left it on purpose. Sometimes you not only need a reminder of how far you’ve come, but on how you can still make the same mistakes. As my husband says, “Can you still nap under it? Then it’s fine.”

No idea how I’ll quilt this yet – probably something all over, just to get it done. For the backing I think I’ll go with an allover print from stash, just to keep up with the overall bright colors from the front. Then a scrappy or bright solid binding.

Oversize log cabin

Posted on 4 Comments

I made this oversize single log cabin block quilt way back in May of 2012.

boy log cabin

I just pulled pieces of kid prints from my stash and went to town, building up a block until it was a decent size. I did very little cutting of fabric.

This summer, I finally got around to quilting it. I backed it in a cheery dinosaur print and did an allover stipple. It was fast. Then I bound it in this great lime green solid.

You can buy this quilt in my Etsy shop too.

Rainbow Northern Lights mini

Posted on 1 Comment

I used the Hex n More ruler and the Northern Lights pattern to make a rainbow wall hanging. I followed the pattern but used the smallest size on the ruler.

It took a while because of the small pieces and I kept putting it down to work on other things. But, once the top was completely done, I did straight line quilting to match the zig zag effect, bound it in black and sent it off as a gift.

I sent it to the head office of the company I work for, so they had more bright art on the walls. They loved it!

I will probably make this again.

As always, click images for bigger.

Scrapper’s Delight

Posted on Leave a comment

I’d like to say I started this quilt after I sorted my scraps, but no – I did this while sorting because the thrill of discovering long lost bits of favourite fabrics was a big draw.

I got Sunday Morning Quilts a few months ago and love every other one in the book, so given I found so many strips and squares, it was only natural I start a Scrapper’s Delight.

While sewing, I also watched the entirely of Rosemary and Thyme on Netflix, so there’s double duty tasks for you.

Snippets, the smallest I'll use.

And this is the part where I have to admit even more to being super obsessive about my scrap sorting. I set aside the smaller blocks (under 2.5″) that I would use for the middles, and and odd sized widths of strips (basically not 2.5″ and not less than 1″).

Scrappy sewing organization.

While sewing, I also resorted some of the smaller piles of strips and blocks by *length* as well. This way, when I sewed my smaller blocks together and need a strip to sew alongside, I could lay the block next to a variety of strips and find one closest to the size I needed. Sure, I could trim any piece, but the aim here was to not make even more scraps.

Scrapper's delight quilt blocks. I'd like to say this made a dent, but...

It also really helped me to choose truly random bits of fabrics for an even more scrappy look and not being drawn to ones that would match or co-ordinate too much. The only ones I would full out discount was ones that were the same prints in different colorways, or ones too similar in color.

I chain piece a lot, so I would do at least 4 blocks at a time, sewing a new strip to each one, pressing those, then choosing a new piece for the next side. All those blocks and I only had to use my seam ripper once.
And a few more blocks started. I want to keep going but I want to go see my grand babies too. They win :)

The only other issue I have is I tend to get wobbly when flipping and pressing, so some blocks wound up a bit wonky without straight lines. This works in a quilt like this – not so much when you’re going for accuracy. Then again, I know I also threw caution to the wind and tossed in some strip I know were not cut straight, especially when I saw my pressing issues.

Not the final layout, but here's my scrappy progress.  Loving this quilt. Will likely make two.

In a quilt like this it’s also fun to lay the blocks out and try different patterns. I’ll probably stick to the layout in the book though.

The other things that struck me was the segment of quilts (usually older ones, more traditional) that don’t save scraps, don’t make scrap quilts and even turn their nose up at scraps, disposing of them entirely.

So many scrappy quilt blocks.

I mean – there’s a LOT of fabric in this quilt. This stack of blocks is heavy.

I was planning on making maybe even two of this quilt if I had enough scraps (not quite) and selling one. In all my posting progress on Instagram, a friend called dibs on it and will buy it when completed, so it’s now spoken for. I just have to have it finished by Christmas with time to mail to Alabama. 😉

Likely it will be stippling all over, nothing fancy. It’s a big quilt, definitely bed sized. Those blocks finish at 12″.

Scrapper's delight quilt top. Bed sized by the time I finish.

Scrap organization

Posted on 1 Comment

This week I did two things: work on organizing one of my scrap bins and worked on quilting a block or two of a really simple baby quilt.

The baby quilt is just 16 10″ blocks all sewed together. They were leftover from my summer quilt here. I found a large floral for the backing which frankly, hadn’t inspired me for anything but a quilt back.

Quilt I'm working on this week.

For each block, I’m quilting a different design, working my way through Free-Motion Quilting with Angela Walters. When I need a break from the computer and desk work, I just move myself downstairs to the sewing room and quilt a block or two. That’s usually long enough for a readjustment. (mentally, physically) Although, one day this week I had a scheduled call and almost forgot to go back upstairs. I was just about to quilt another block but decided to check on work instead. Good thing I did!

I should just call this my @angelafmq sampler quilt ... ;) every block is a design from her first book.

I did quilt about half the blocks this week.

For the scraps, I lugged a big bin upstairs near my desk. For short break, I just wander over and fondle fabric for a bit. I mean.. carefully go through the pile and sort.

Still sorting scraps. Kicking myself but glad I got rid of another scrap bin already.

It’s a bit overwhelming but eventually I made decisions based on the kind of scraps I had – not trying to fit in someone else’s system.

Then I had to clean some up because the husband wanted to sweep the floor. Crazy guy. So I took some piles to the sewing room to sort further.

Don't be fooled, it only looks organized and like I know what I'm doing.

Turns out I have a lot of strips and some blocks. I tried not to trim too much, just to even things out. Anything bigger than a fat quarter of course was not a scrap. Anything slightly less than that I called a chunk and also set aside. I figured there was no point cutting up larger chunks into preset sizes if I wanted to do something else with them.

So, that left me with the rest.

I sorted strips into under 2.5″ to 1″ and short medium long piles. Medium anything over 12″, long was selvedge to selvedge or near enough. If I had to fold it to pile it on my cutting board, it was long.

I also had a pile for 2.5″ strips and a pile 3″ or wider.

For squares, I sorted two piles – 2.5″ or 3″ squares, then 4″ or larger.

Anything smaller than any of those was a snippet. If it was really long I placed it in a strings bag. The bag of string is going to my mom, because she loves making string quilts, and I don’t.

I have other fabrics sorted by color and felt for my scraps, sorting by size made more sense *for me* because that was how I chose fabrics for quilts – by what I had, not by what colors.

Organized scraps

I did spend a large chunk of Friday and Saturday ironing and trimming scraps. It sounds a little obsessive but I feel so organized! And so ready to make a pile of new quilts, just based on what is there.

I even – oopsie – started piecing Scrapper’s Delight out of Sunday Morning Quilts.

My overriding goal here is to actually build a new stash by using up what I can with the stash I have. The stash is more a reflection of what was cheap / found in thrift stores & yard sales and stuff my mom didn’t want, to build up my stash. I just took some fabrics because they were cheap / free. A lot of it doesn’t actually reflect my taste, so. There we are.

(I will say I do have a drawer full of fabrics that are more reflective of my tastes, but I haven’t used much of them yet. That’s why most of the scraps are not really me – I used the fabrics I only sort of liked first, to use them up. And in this sorting, I’m ditching fabrics I really do not like.)

So… how about you? How do you sort and organize your fabrics? What do you do with your scraps?

Appliqued baby name quilt

Posted on Leave a comment

When I heard I was going to be a grandmother for the third time in four years, well of course my first thought was what quilt I was going to make.

Okay, maybe that was my second thought.

After I made this baby quilt, I figured you would love to have this free baby quilt pattern. It was super fast and easy to make.

I had a yard or two of a lovely fabric with dancing bunnies in pretty pastel Easter gowns. It was perfect after we knew we would be expecting another girl. I pulled some somewhat matching tiny prints for the letters for the front of the quilt.

baby quilt letter placement

For the front piece of the baby quilt, I used about a yard of a tone on tone off-white print. It’s about 30-36″ by the 42″ width of the fabric. Then I cut the letters freehand from the fat quarters I had chosen to complement the print on the back.

The letters could also be done with a large thick font. My size was about as big as a regular sheet of printer paper, so you could draw them out on paper first and then cut them from the fabric.

It would be smarter as well, to fuse some fusible web to the back of the fabric before cutting out the letters. I didn’t, and it made my work a bit harder.

Also if you have a name with a lot more letters, you will need to make the letters smaller so they all fit. If you’re not sure, do a test with paper letters first.

baby quilt testing fabric placement


You can see here how I didn’t like the original fabric for the letter A and swapped it for a yellow instead.

fusing letters in place on baby quilt


Here’s the quilt on my design board with the letters pinned in place to test placement. You can go vertically in a straight line – mark a guide line if you like – or go all funky and wonky.

Fuse the letters in place. This is mostly to hold them down before appliquéing.  I used a blanket stitch that came on my Bernina Aurora 440 Quilter’s Edition. A zig zag will also work perfectly fine.

back of baby quilt


Baste the top and bottom together with your favourite batting and quilt away! I used an allover paisley design, and went around the letters entirely, adjusting the design to fit. This is great practise for any allover design you want to try. And a baby quilt is a great size to practise on.

I also used a pretty Sulky variegated thread in pink / green / yellow. It matched perfectly.

easy fast baby quilt


You can see here how puffy the letters look. The only thing I would do different now is to outline quilt the letters.

IMG_0624


I bound the quilt in a jade green dot that was actually from a line of Christmas fabric. It works though!

I always pre-wash my quilt, so after coming out of the washer and dryer, the cotton fabrics and cotton batting crinkled up so nicely. It looks like a family heirloom already.

This is a super easy and fast quilt to through together. Just make sure the parents don’t change the name before birth, if you are making one ahead of time. 😉

Back in the swing of it

Posted on 12 Comments

Now that the room is up, I’ve been making time to spend down there. I also got some Craftsy classes, including Quilting Negative Space. I’m a HUGE fan of Angela already and this class is just great. I’m really enjoying it, even though I listen along as I’m making supper.

Tonight I had the itch to quilt so I decided to practise some patterns from Angela’s book along with encouragement from her course. I already had a baby quilt laying in a sad pile waiting for me to figure out how to do it. I took Angela’s advice to break it up into smaller sections. It’s improv pieced so there’s no real background, but since it’s so wild, I figured it was a great chance to practise different techniques all over it.

IMG_0156


Here I did two long pieces near the middle to start off and warm up.


IMG_0157


You can see the loops, back and forth (love this) and some swirls.

IMG_0158


Close up of doing the all over leaf pattern in the next “block”.


IMG_0159

IMG_0160


In this block I marked a single line diagonally across then followed it to make the sunburst effect. I love how it feels.


IMG_0161


Two more long strips gave me the opportunity to try the swirl scroll and woodgrain. The scroll needs some work, but it’s good enough!


IMG_0162


And there’s all the work I did this evening. Halfway done!

It was quite fun doing a different design in each section or strip.


Update: I actually went through a whole bobbin last night, did a quick bit this morning and ran out of the *second* bobbin,